
A stable broadband connection is the foundation of high-definition streaming on your Android TV box. If you want to know how to connect SuperBox to Wi-Fi, the process takes less than two minutes from your home screen. At SuperBox For Sale, our engineering team tests wireless transceivers across the entire model family, from the S4 Pro to the flagship S7 series. Connecting to the correct frequency band eliminates live video buffering and ensures crystal-clear 4K sports playback. This guide provides direct instructions for connecting to home Wi-Fi networks, choosing between wireless frequencies, and plugging in direct Ethernet cables.
Summary
- Two-Minute Wireless Setup: Navigate to Settings, open Network & Internet, toggle Wi-Fi on, and select your home network SSID.
- Prefer 5GHz or 6GHz Bands: Always connect to your router 5GHz wireless band for high-bitrate 4K streaming without wireless interference.
- Wired Ethernet Backup: Plugging a Cat6 Ethernet cable into the rear RJ45 LAN port establishes an instant, zero-configuration internet link.
- Accurate Password Entry: Use the on-screen keyboard carefully to input capitalization and special characters accurately before clicking Done.
- Resolve Saved Errors: If your network status displays Saved without connecting, forget the network, restart your router, and reconnect.
Method 1: Connect to Wi-Fi via the SuperBox Settings Menu
Connecting your SuperBox to your home wireless network takes only a few clicks using your remote control. Follow these direct steps to link your device.
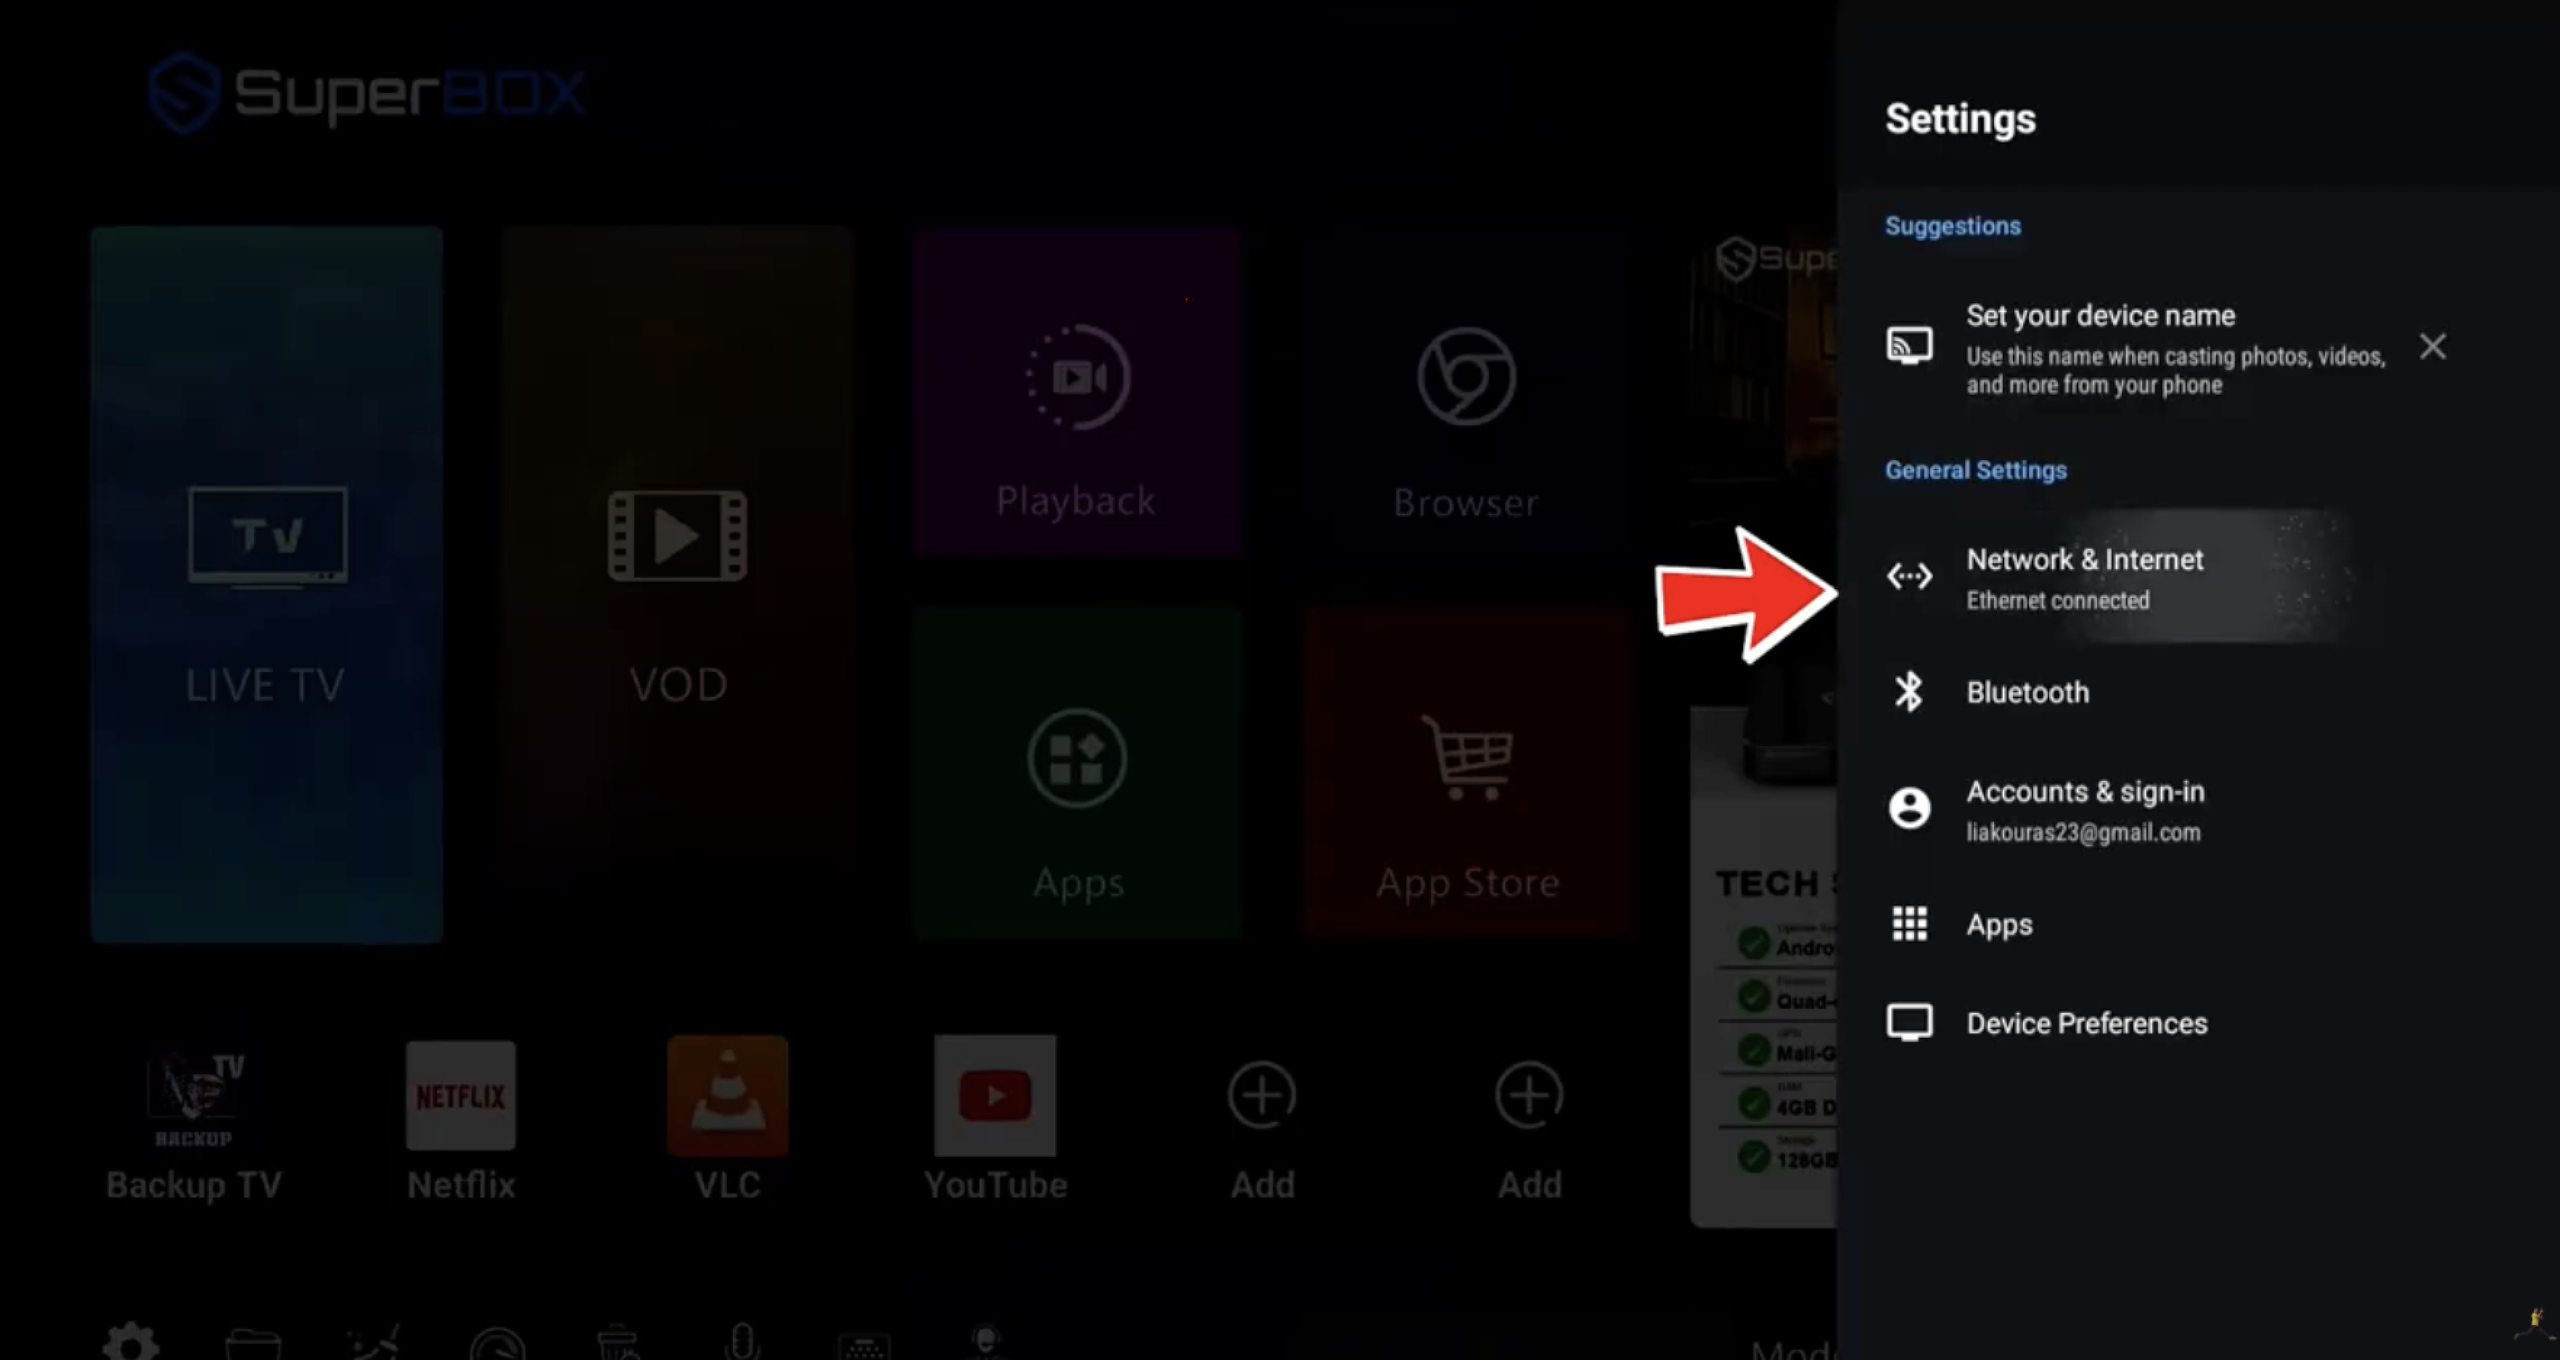
- Open Settings: From the main home launcher, navigate to the bottom or top-right toolbar and click the Settings gear icon.
- Access Network & Internet: Click on Network & Internet at the top of the settings options list.
- Enable the Wi-Fi switch: Ensure the Wi-Fi toggle switch is enabled in the ON position. The box will begin scanning for nearby routers.
- Select your home network: Browse the available network list and click your Wi-Fi network name (SSID), choosing your 5GHz network if available.
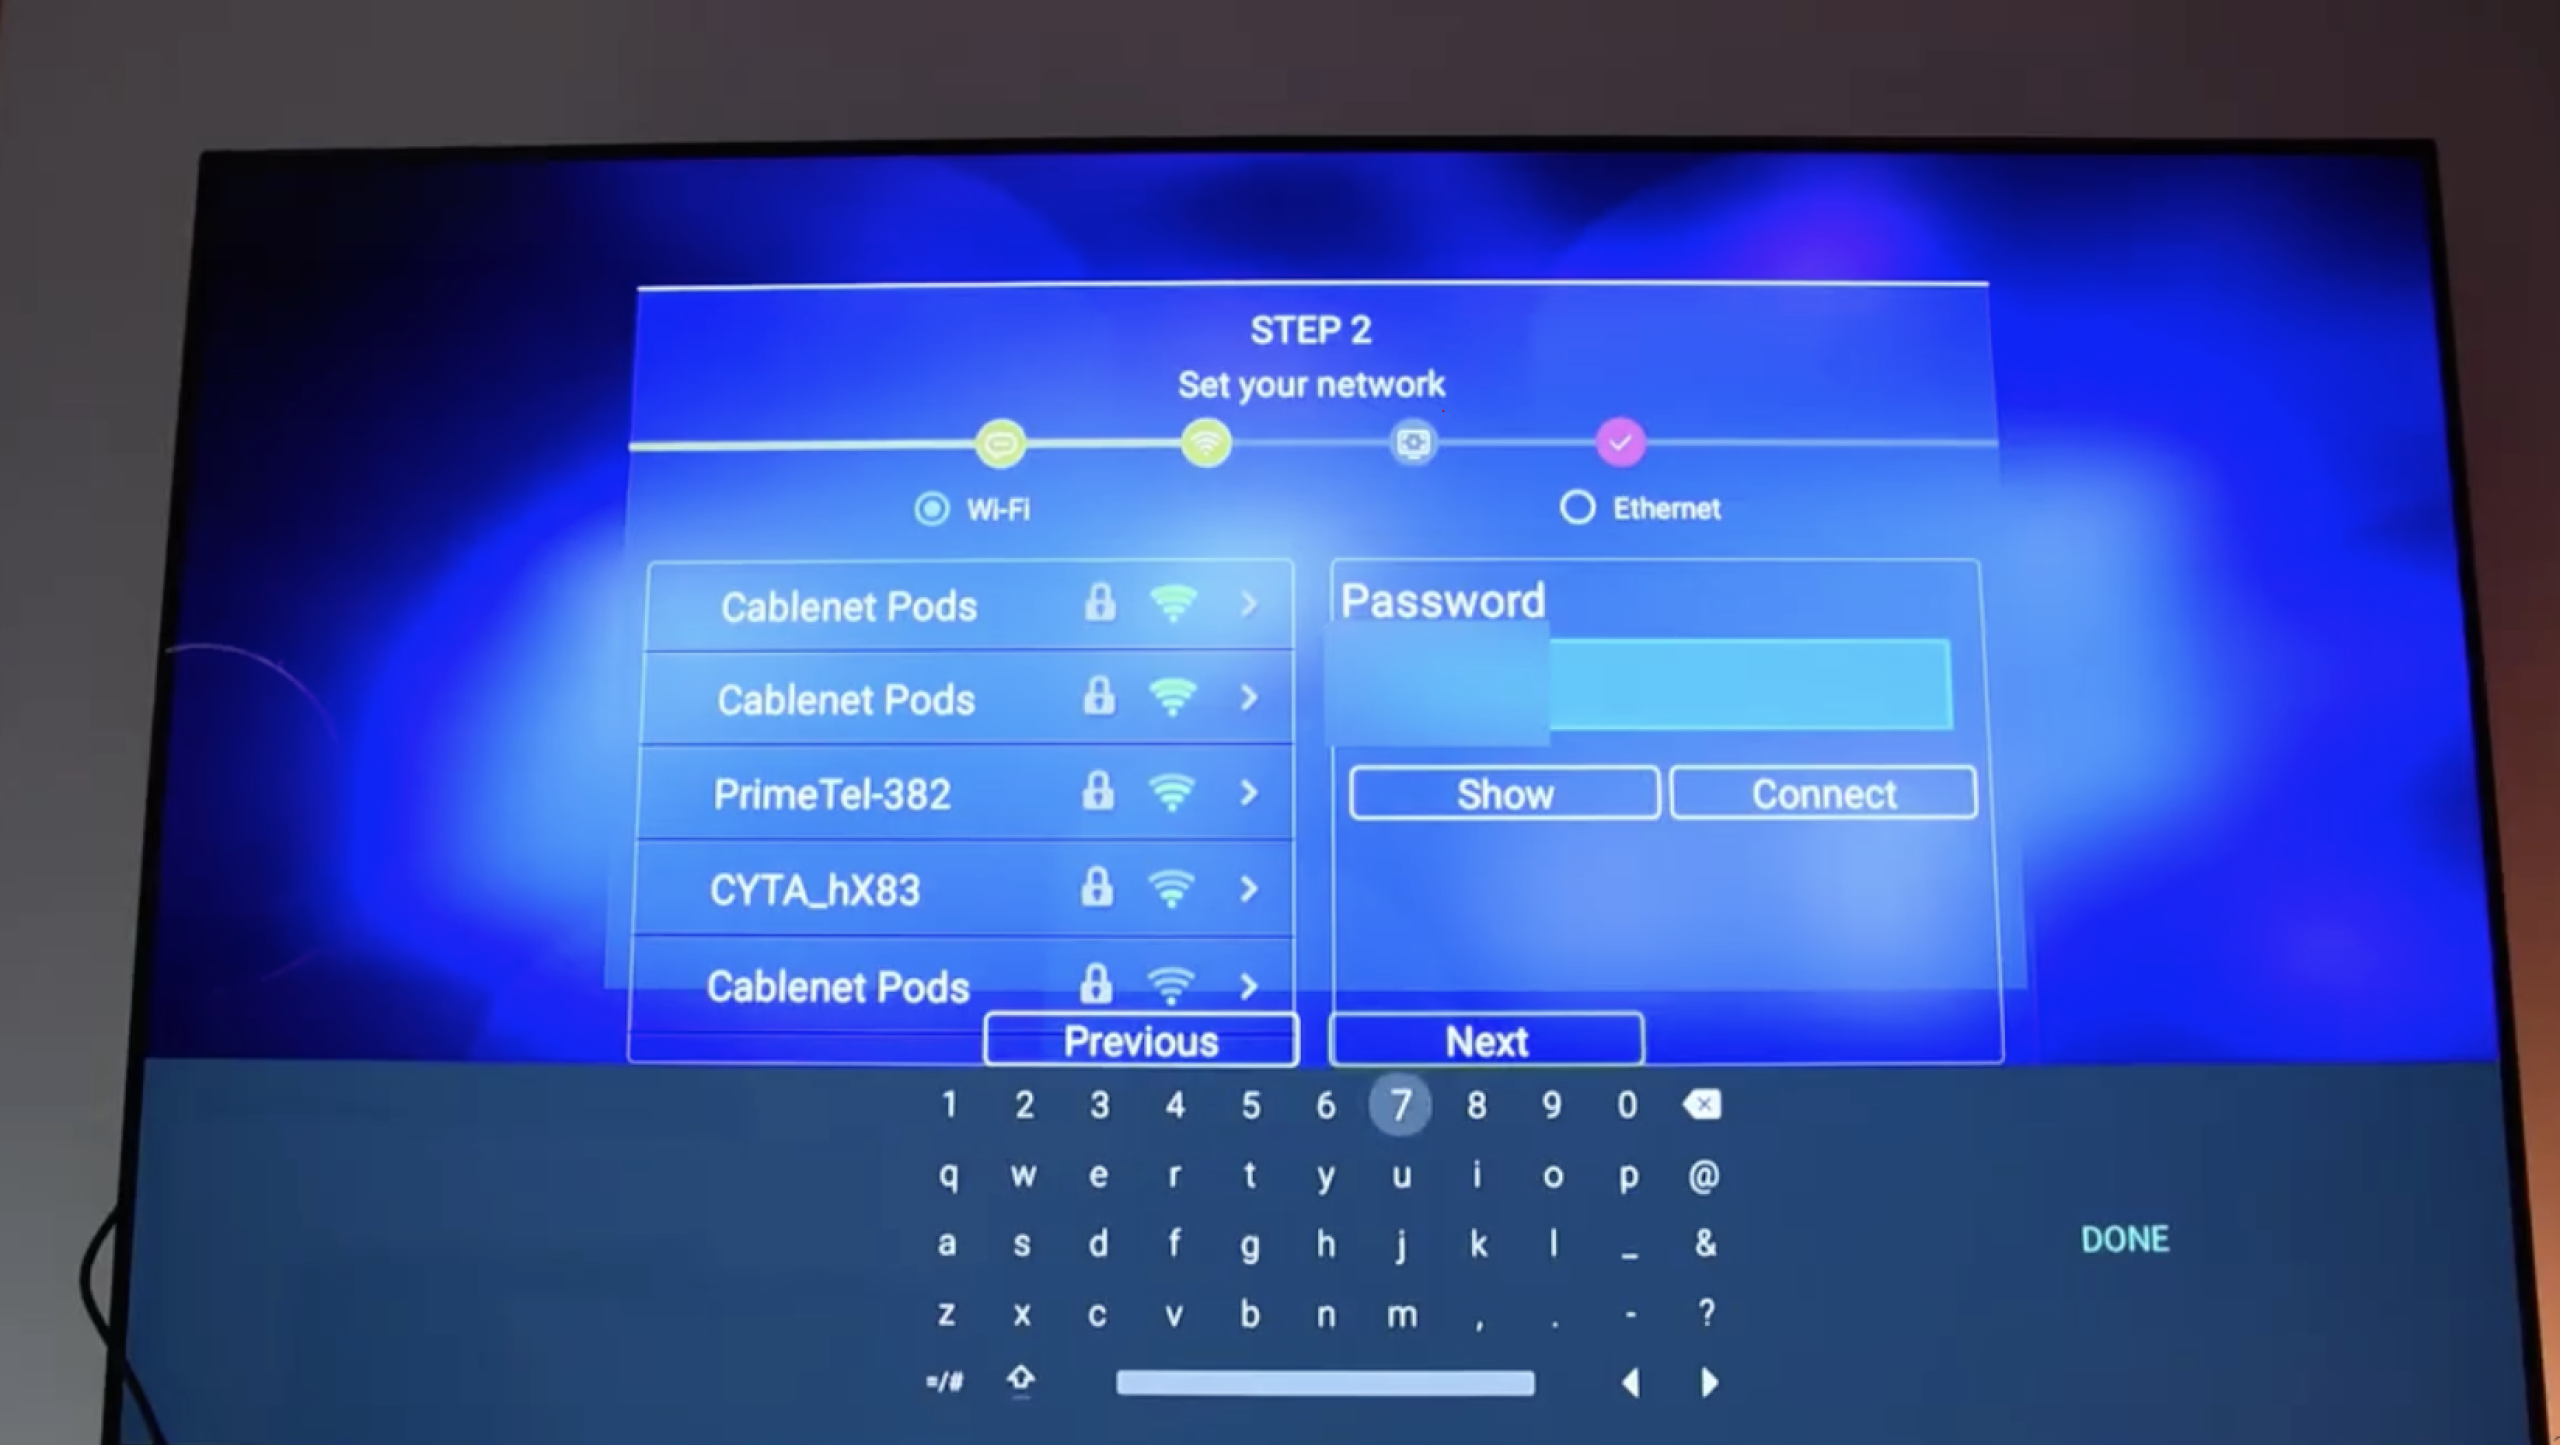
- Enter your Wi-Fi password: Use the remote control directional pad to enter your wireless security key on the virtual keyboard.
- Confirm connection: Click the checkmark or Done button. The network status will change from Connecting to Connected successfully.
Method 2: Configure Wi-Fi During Initial First-Time Setup
When you unbox a brand new SuperBox or restore factory defaults, the automated initial setup wizard guides you through network pairing before opening the main interface.
- Complete remote pairing: Follow the on-screen prompt to pair your Bluetooth remote control by holding the OK and Return buttons.
- Select your language: Choose your preferred language from the configuration list.
- Select Wi-Fi configuration: The setup wizard displays available wireless networks automatically on screen.
- Connect to your router: Highlight your home network, press OK, enter your password, and proceed to the home screen.
After connecting to the internet, follow our tutorial on how to watch live TV on SuperBox to start streaming channels immediately.
Watch this video guide by Liakouras Momentz demonstrating the complete Wi-Fi and Ethernet connection process on a SuperBox:
Method 3: Connect via Direct Ethernet LAN Cable (Instant Plug-and-Play)
If your home router is located near your television console, an Ethernet cable provides the most dependable connection. Wired networking bypasses wireless signal congestion entirely.
- Obtain a Cat5e or Cat6 cable: Prepare a standard RJ45 network patch cord of appropriate length.
- Plug into your home router: Insert one connector into an available LAN port on the back of your home modem or router.
- Plug into your SuperBox: Insert the other end into the LAN port located on the back panel of the SuperBox.
- Verify automated connection: The SuperBox detects the wired signal instantly. An Ethernet icon appears on the status bar, requiring zero passwords.
If your device experiences stuttering feeds or frozen video streams, explore our tested solutions for fixing SuperBox buffering issues.
Method 4: Troubleshoot Common Wi-Fi Connection Failures
If your SuperBox displays connection errors, drops offline intermittently, or says Connected with No Internet, apply these targeted troubleshooting fixes.
- Forget and reconnect network: Open Settings > Network & Internet, select your Wi-Fi SSID, click Forget Network, and reconnect with your password.
- Power cycle modem and box: Unplug the power cords from both your SuperBox and home router for 60 seconds to refresh IP tables.
- Switch from 2.4GHz to 5GHz: If your 2.4GHz band buffers, select the 5GHz SSID to avoid interference from microwave ovens and neighboring routers.
- Adjust external Wi-Fi antennas: If your model features dual external antennas, position them vertically at a 90-degree angle for optimal signal reception.
- Set static Google DNS: Change your IP settings to Static and configure DNS 1 as 8.8.8.8 and DNS 2 as 8.8.4.4 to bypass ISP routing blocks.
If your Blue TV app refuses to load channels after connecting to Wi-Fi, review our step-by-step fix on resolving SuperBox Blue TV not working errors.
Connecting your SuperBox to high-speed broadband unlocks its full entertainment potential. While 2.4GHz Wi-Fi offers extended range, connecting to the 5GHz wireless band or plugging in a direct Ethernet cable provides the best performance for live sports. Keep your router firmware updated and maintain clear antenna positioning for an uninterrupted home viewing experience.
If your older streaming box lacks modern Wi-Fi 6 technology, explore our catalog of authentic SuperBox models for sale featuring high-gain dual antennas and full manufacturer warranties.
Experience Unrivaled Streaming Performance with SuperBox
Discover lightning-fast quad-core processing, dual-band Wi-Fi 6, 7-day playback, and crisp 6K ultra HD output engineered for discerning media fans.